|
|
|
|
|
|
|
|
|
|
|
|
|
|
|
|
|
|
 |
 |
|
 |
|
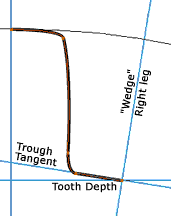
| Next we need to create one tooth of the gear with half of each adjacent trough flanking it on both sides. Choose the Path Tool (P), and starting at the point where the vertical center guideline intersects with the top of the circle draw the right half of the gear's tooth and half of the trough beside it. (SeeFigure 3) |
|
 |
|
|
|
|
|
|
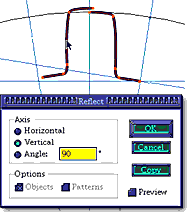
| Make sure the curve at the top of the tooth doesn't extend up past the line indicating the circle. Keep it flattened, with the curve of the tooth meeting the circle/guideline intersection at the tangent point. Similarly, at the bottom of the trough, you don't want to create a path that extends below the 81° tangent guideline. The ending point of the path, which will indicate the mid-point of the bottom of the trough should sit directly on top of the intersection of the tangent guideline and the guideline that indicates the right leg of the "Wedge". When you're satisfied with the shape of the "half-tooth/half-trough" profile, use the Selection Tool (V) to select it. In the main menu bar choose Object—>Transform—>Reflect...Check the "Vertical" box and click on "Copy". Move the new mirror image object so the point at the top of the tooth overlaps its twin on the original. (See Figure 4)
If all went well, the point at the bottom of this new object will be lined up directly over the guideline that indicates the left leg of the "Wedge". |
|
|
|
|
|
|
|
|
Figure 3 |
|
|
|
|
|
|
|
|
|
 |
|
|
|
|
|
|
Figure 4 |
|
|
|
|
|
|
|
|
|
|
|
 |
|
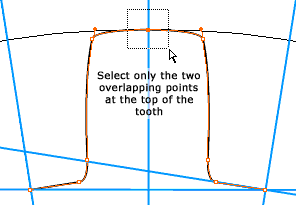
| When the two halves have been placed exactly where you want them, with the points lined up over their respective guidline intersections you'll need to join them to create one object. Choose the Direct Selection Tool (A) and select only the two overlapping points at the top of the tooth (See Figure 5). With these two points selected use the keyboard command of Command/Control + J to join the two halves to create one full tooth with half of a trough on either side of it. |
|
|
|
|
|
|
|
|
|
|
Figure 5 |
|
|
|
|
|
|
|
|
 |
|
|
| Now that we have one tooth we need to copy it multiple times around the center point. We're making a gear with 20 teeth and 360° divided by 20 equals 18°—again, our "wedge angle." With the tooth selected type "R" to select the Rotate Tool, and while holding the Option/Alt key, click and place the rotate axis target directly on top of the intersection of the vertical and horizontal guidelines. When the Rotate dialogue box pops up enter a value equal to your wedge angle—in our example that's 18°—and click on the "Copy" button. (See Figure 6) Now, by pressing Command/Control + D you can repeat the copy/transformation as many times as needed to produce all the teeth necessary to complete the gear. |
|
|
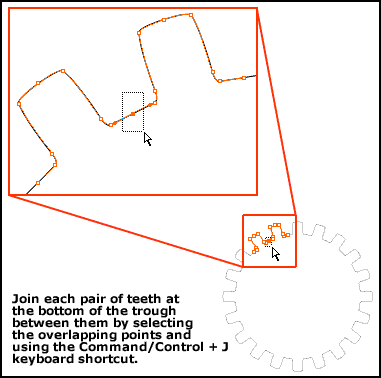
| Now that all the teeth have been placed in a circle, you'll need to connect them together just as you did with the first two by using the Direct Selection Tool. (SeeFigure 7) When this step is completed the entire gear will be one continuous path and you may then set the width and color of the stroke and the color of the fill. |
|
|
|
|
|
|
|
|
|
|
Figure 6 |
|
|
 |
|
|
|
|
|
|
|
|
|
|
|
|
| Now that you have the basics down you'll be able to create a PerfectGear of any size, with any number of teeth. It's entirely up to your discretion how you want to shape the teeth and troughs of the gears you create. To add texture, copy and paste the path into a Photshop document.
And as always, above everything else, have fun! |
|
|
|
|
|
|
|
|
 |
|
|
|
Figure 7 |
|
|
|
|
|
|
|
|
|
|
|
|
|